Finding the right ring size is the difference between a piece you’ll wear daily and one that sits unused in a jewelry box. The global jewelry market size was valued at USD 232.94 billion in 2024 and is projected to grow from USD 242.79 billion in 2025 to USD 343.90 billion by 2032, exhibiting a CAGR of 5.10%. Whether you’re buying an engagement ring, a birthday gift, or a treat for yourself, accurately measuring ring size doesn’t require fancy tools—just a few simple supplies and the right know-how. This guide breaks down easy DIY methods, pro tricks, and key considerations to ensure your ring fits comfortably and securely, every time.

Why Accurate Ring Sizing Matters
Before diving into methods, it’s important to understand why getting the size right is critical. A poorly fitting ring isn’t just inconvenient—it can risk damage or loss:
-
Too Loose: A ring that’s too big may slip off accidentally (especially during activities like washing hands or exercising) and get lost or scratched.
-
Too Tight: A tight ring can restrict blood flow, cause discomfort (e.g., indentations on the finger), or become stuck—especially in hot weather, when fingers swell slightly.
-
Resizing Risks: While many rings can be resized, frequent adjustments weaken the metal (especially for thin bands or those with gemstones). Some styles (e.g., full eternity bands or tension-set rings) can’t be resized at all, making accurate measurements non-negotiable.
What You Need to Find Ring Size
Most DIY ring sizing methods use common household items—no special equipment required. Gather these supplies before you start:
-
A soft measuring tape (flexible, not rigid) or a strip of paper (1/2 inch wide, 6 inches long).
-
A pen or pencil.
-
A ruler (preferably with millimeters, for precise measurements).
-
A ring that already fits the intended finger (if measuring for someone else and you have access to their jewelry).
-
Optional: A ring sizer tool (affordable online or at craft stores—ideal for frequent jewelry buyers).
Pro Tip: Measure fingers at the end of the day (fingers are slightly swollen in the morning) and avoid measuring after exercise, eating salty meals, or taking hot showers—all of which can temporarily increase finger size.
5 Easy DIY Methods to Find Ring Size
These step-by-step methods work for measuring your own finger or someone else’s (even secretly, for gifting!). Choose the one that best fits your situation.

Method 1: Use a Flexible Measuring Tape (Most Accurate for Your Own Finger)
This is the simplest way to measure your own ring size, as it provides direct circumference measurements (the key to determining size).
-
Wrap the flexible measuring tape around the base of the intended finger—snug enough to stay in place, but not tight enough to leave a mark.
-
Record the measurement in millimeters (mm)—this is the finger’s circumference.
-
Use a ring size chart (see Section 5) to convert the circumference to a standard ring size (e.g., US, UK, or EU sizing).
Example: A finger circumference of 54mm typically corresponds to a US size 6, UK size L, or EU size 54.
Method 2: Paper Strip Method (Great for Secret Gifting)
If you’re measuring someone else’s finger without them noticing (e.g., for a surprise gift), a paper strip is discreet and easy to use.
-
Cut a strip of paper (1/2 inch wide, 6 inches long) and wrap it around the base of their finger.
-
Mark where the end of the paper overlaps with the rest of the strip (use a light touch to avoid alerting them!).
-
Lay the paper flat and measure the distance from the start of the strip to your mark, in millimeters.
-
Convert the measurement to a ring size using a size chart.
Pro Tip: If the person is wearing a ring on the same finger, slide the paper strip under the ring to get a more accurate fit—this mimics how the ring sits.
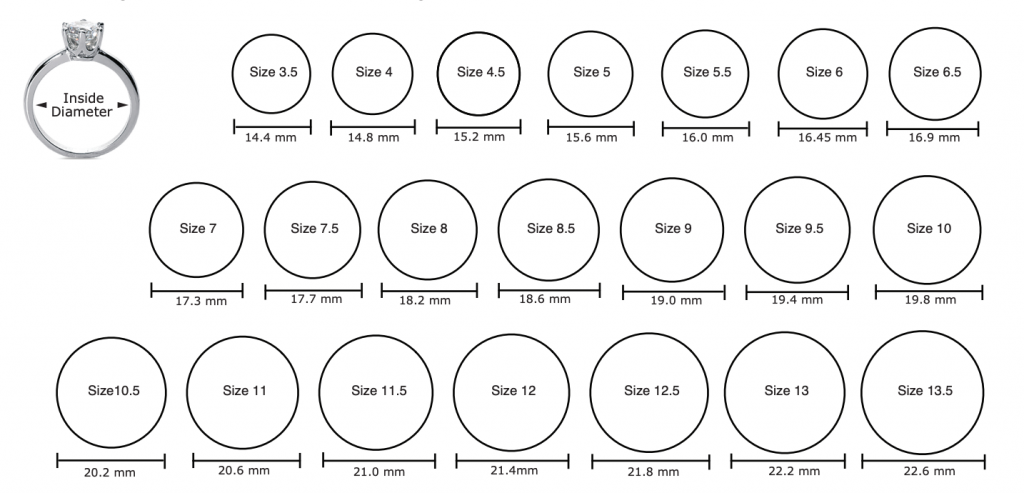
Method 3: Use an Existing Ring (Best for Gifting When You Have Access to Their Jewelry)
If you can borrow a ring that already fits the intended finger (e.g., a casual band they wear daily), this method is fast and reliable.
-
Place the ring flat on a ruler, with the inner edge (the part that touches the finger) aligned with the 0mm mark.
-
Measure the inner diameter of the ring (the distance across the center, from one inner edge to the other) in millimeters.
-
Multiply the diameter by 3.14 (pi) to get the circumference (e.g., a 17mm diameter = 17 x 3.14 = 53.38mm circumference).
-
Convert the circumference to a ring size using a size chart.
Note: This works only for solid bands (not open-back or adjustable rings), as their inner diameter accurately reflects the finger size.
Method 4: Adjustable Ring Sizer Tool (Most Convenient for Multiple Measurements)
An adjustable ring sizer (a plastic or metal strip with marked sizes) is affordable ($5–$10 online) and ideal if you’re measuring multiple fingers or shopping for jewelry frequently.
-
Slide the sizer onto the intended finger, adjusting the metal tab until it fits snugly (but not tightly).
-
Read the size marked on the sizer—most tools show US, UK, and EU sizes for versatility.
Pro Tip: Keep the sizer on for 1–2 minutes to ensure it’s comfortable when the finger adjusts to the fit.
Method 5: Online Ring Sizing Apps (Tech-Savvy Option)
Several free apps (e.g., “Ring Sizer” by Jewelry Tools or “Measure Ring Size” by SizeMyRing) use your phone’s camera to measure ring size. Here’s how to use them:
-
Print the app’s provided “calibration sheet” and place it on a flat surface (this ensures the camera measures accurately).
-
Follow the app’s instructions to either:
-
Take a photo of an existing ring placed on the calibration sheet (to measure its diameter), or
-
Wrap a paper strip around the finger, mark it, and take a photo of the strip next to the calibration sheet.
-
The app will calculate the ring size and provide conversions for different sizing systems.
Caution: Ensure good lighting when using apps—poor lighting can lead to inaccurate measurements. Use this method as a backup, not your sole measurement.
Ring Size Conversion Chart: US, UK, EU & More
Ring sizes vary by region (e.g., a US size 6 is different from a UK size 6). Use this chart to convert your circumference (in mm) to the most common sizing systems:
|
Finger Circumference (mm) |
US Size |
UK Size |
EU Size |
|
49 |
4 |
F |
49 |
|
51 |
5 |
H |
51 |
|
54 |
6 |
L |
54 |
|
56 |
7 |
N |
56 |
|
59 |
8 |
Q |
59 |
|
61 |
9 |
S |
61 |
|
64 |
10 |
U |
64 |
Note: Sizes may vary slightly by jeweler—always check their specific size chart if shopping online.
Special Considerations for Accurate Sizing
Not all fingers (or rings) are the same—these factors can affect your measurement, so adjust accordingly:

1. Different Fingers = Different Sizes
Most people have slightly different sizes for each finger. For example:
-
Ring fingers (left hand for engagement/wedding rings) are often 1/2 to 1 size smaller than middle fingers.
-
Pinky fingers are typically 2–3 sizes smaller than ring fingers (e.g., a US size 3–4 for pinkies, vs. 6–7 for ring fingers).
Always measure the exact finger the ring will be worn on—never assume sizes are interchangeable.
2. Wide Bands Require a Larger Size
Rings with wide bands (6mm or thicker, e.g., chunky statement rings or men’s bands) need a slightly larger size than thin bands. This is because wide bands sit more rigidly on the finger and don’t flex as much.
-
For bands 6–8mm wide: Add 1/4 size to your measurement (e.g., US size 6 → 6.25).
-
For bands 9mm+ wide: Add 1/2 size (e.g., US size 6 → 6.5).
3. Seasonal & Temperature Changes
Fingers swell in warm weather (summer, hot showers) and shrink in cold weather (winter, air conditioning). To account for this:
-
If measuring in summer: Use the exact measurement (the ring will fit comfortably in winter).
-
If measuring in winter: Add 1/4 size (the ring won’t feel too tight in summer).
4. Gifting to Someone with Unknown Size
If you’re gifting a ring and can’t measure the recipient’s finger, use these workarounds:
-
Ask a friend or family member who knows their jewelry size (e.g., “Does Sarah wear a size 6 or 7 ring?”).
-
Choose an adjustable ring (e.g., open-back bands or rings with sliding clasps) that can fit multiple sizes.
-
Opt for a style that’s easy to resize (e.g., plain metal bands without gemstones) and include a note offering to resize it if needed.
Common Mistakes to Avoid When Finding Ring Size
Even simple methods can go wrong—steer clear of these errors to ensure accuracy:
-
Measuring Too Tight: Pulling the measuring tape or paper strip too tight will result in a ring that’s too small. Aim for a fit that allows you to slide the tape/strip slightly up and down the finger.
-
Using Rigid Tools: A metal ruler or stiff paper won’t conform to the finger’s curve, leading to incorrect circumference measurements. Always use flexible tools.
-
Ignoring Band Width: Forgetting to adjust for wide bands is one of the most common mistakes—this leads to a ring that’s too tight, even if the measurement was correct for a thin band.
-
Measuring Once: Fingers can vary in size throughout the day—measure 2–3 times (at different times) and take the average for the most accurate result.

When to Get Professional Sizing
While DIY methods work for most cases, there are times to visit a jeweler for professional sizing:
-
Engagement/Wedding Rings: These are investment pieces—professional sizing ensures a perfect fit, especially for styles that can’t be resized (e.g., full eternity bands).
-
Wide or Intricate Bands: Jewelers have specialized tools (e.g., mandrels) to measure wide bands accurately, accounting for their rigidity.
-
Uncertain Measurements: If your DIY results are inconsistent (e.g., one measurement says US size 6, another says 6.5), a jeweler can resolve the discrepancy.
Most jewelers offer free sizing—just call ahead to confirm, and avoid wearing lotions or gloves to the appointment (these can affect measurements).
Conclusion: Get the Perfect Fit Every Time
Finding ring size doesn’t have to be stressful—with the right tools and methods, you can measure accurately at home, whether for yourself or a gift. Remember to:
-
Measure at the end of the day, avoiding swelling triggers.
-
Use flexible tools (measuring tape, paper strips) for curved fingers.
-
Adjust for band width, seasonal changes, and finger type.
-
Use a conversion chart for regional sizing systems.
If you’re still unsure, a quick trip to a jeweler will give you peace of mind. With a perfectly fitting ring, you’ll enjoy comfort, style, and the confidence that your jewelry will last for years to come.
Ready to shop for your perfectly sized ring? Use our guide to measure first, then explore our curated collection of bands, gemstone rings, and more—all designed to fit and flatter. Happy shopping!