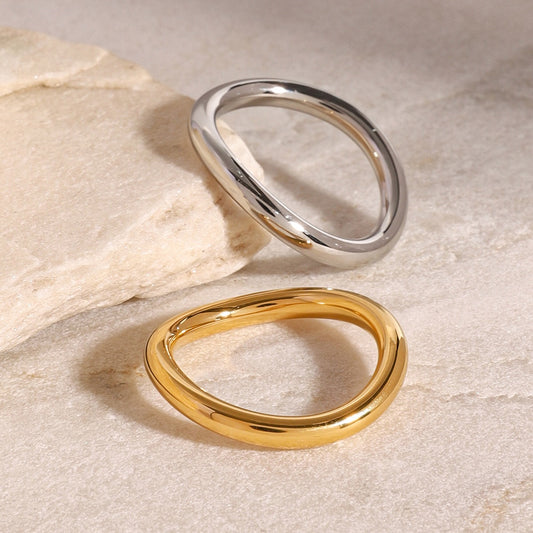


How to measure your ring size is a question every jewelry shopper faces—and getting it wrong can lead to frustration: according to a 2024 survey by the Jewelry Consumer Opinion Council, 52% of online ring buyers return their purchases because of incorrect sizing, wasting time and money on exchanges. The global wedding ring market was estimated at USD 97.3 billion in 2024. The market is expected to grow from USD 101.7 billion in 2025 to USD 181 billion. A ring that’s too tight can irritate your finger or get stuck, while one that’s too loose risks slipping off and getting lost. The good news? Measuring your ring size at home is easy with the right tools and steps. This guide breaks down simple, accurate methods, common pitfalls to avoid, and tips for measuring others—so you can shop for rings with confidence, whether for yourself or a loved one.
What You Need to Know Before Measuring Your Ring Size
Why Ring Size Varies (And When to Measure)
Ring size is determined by the circumference of your finger, measured in millimeters (mm) or U.S. sizes (ranging from 3 to 13 for adults). But your finger size isn’t fixed—it changes based on:
-
Time of Day: Fingers are largest in the afternoon and evening (due to natural swelling) and smallest in the morning.
-
Temperature: Heat causes fingers to swell; cold makes them shrink.
-
Hydration & Activity: Dehydration can make fingers slimmer, while exercise or salt intake can cause swelling.
For the most accurate measurement, always measure your finger in the afternoon or evening—avoid first thing in the morning or after intense workouts.

Essential Tools for Measuring Your Ring Size
You don’t need expensive equipment to measure your ring size—most tools are items you already have at home, or affordable to buy:
-
Flexible Measuring Tape: The easiest tool for direct circumference measurement (look for one marked in mm).
-
String or Floss: A budget-friendly alternative to measuring tape (pair with a ruler for mm measurements).
-
Printable Ring Size Chart: Free to download online—works if you have an existing well-fitting ring.
-
Plastic Ring Sizer Kit: A \(5–\)10 investment from craft stores or Amazon, with pre-sized plastic rings for instant fitting.
-
Ruler (mm): Critical for converting string/tape measurements to U.S. sizes (most rulers have mm markings on the side).
Avoid using paper strips alone—they’re stiffer than string and can lead to inaccurate readings.
5 Easy At-Home Methods to Measure Your Ring Size
Method 1: Use a Flexible Measuring Tape
This is the most straightforward method for measuring your own finger:
-
Wrap the flexible measuring tape around the base of the finger where you’ll wear the ring (this is the widest part for most people).
-
Ensure the tape is snug but not tight—you should be able to slide one finger under it without difficulty.
-
Note the measurement in millimeters (mm) — for example, 54mm or 57mm.
-
Convert mm to U.S. size using a chart (e.g., 54mm = U.S. size 6, 57mm = U.S. size 7). Double-check the measurement 2–3 times to confirm.
Pro tip: If measuring for a wide band (6mm or thicker), add 1–2mm to your measurement—wide bands fit tighter than thin ones.
Method 2: String or Floss + Ruler
If you don’t have a measuring tape, string or floss works just as well:
-
Cut a piece of string (or floss) about 6 inches long. Wrap it around the base of your finger, marking the spot where the ends overlap with a pen.
-
Lay the string flat on a ruler and measure the distance between the two marks in mm.
-
Use an online “mm to U.S. ring size” converter to find your size. If your measurement falls between two sizes (e.g., 55.5mm), round up to the larger size—slightly loose rings are easier to adjust than tight ones.
Pro tip: Use white string if possible—dark ink shows up better, making the mark easier to see.
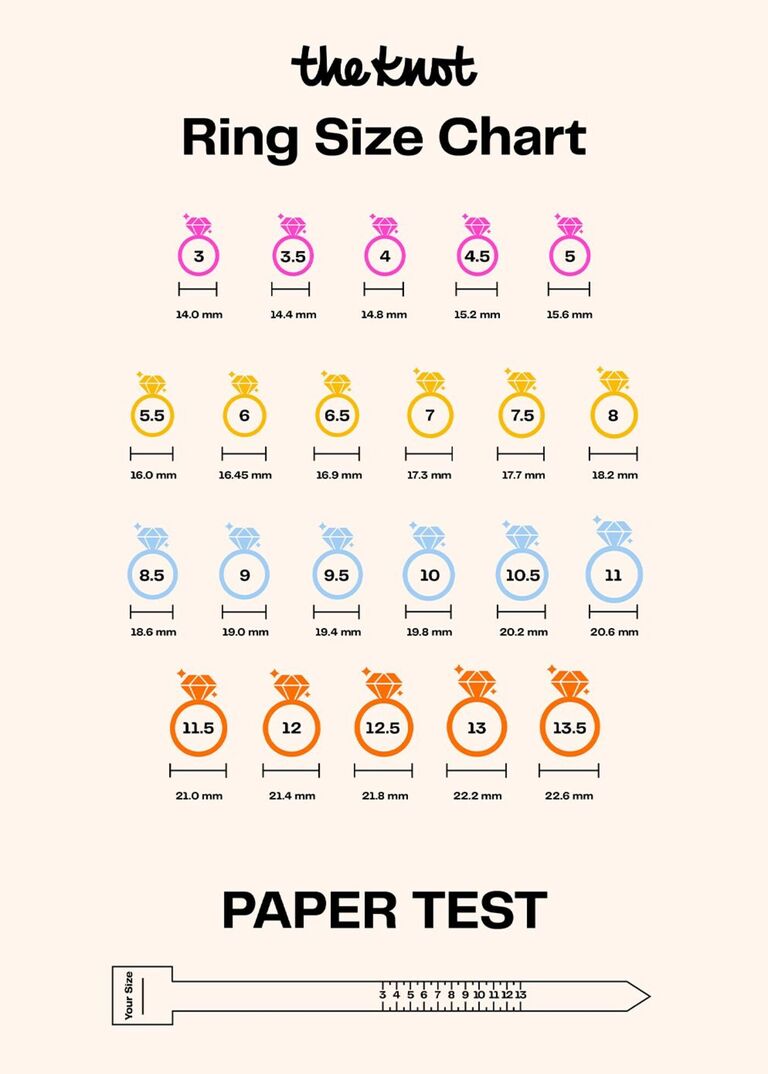
Method 3: Printable Ring Size Chart
A printable chart is ideal if you have an existing ring that fits perfectly:
-
Find a reputable printable ring size chart online (search “free printable ring size chart”)—always select “actual size” when printing (do not scale the page). To verify accuracy, measure the “test circle” on the chart with a ruler (it should match the listed diameter, e.g., 17.3mm for size 7).
-
Place your well-fitting ring on the chart, aligning the inner edge of the ring with the circle that matches its diameter.
-
The size labeled next to the matching circle is your ring size. If the ring overlaps two circles, choose the larger size to ensure a comfortable fit.
Pro tip: This method works best for plain bands—avoid rings with large gemstones or irregular shapes, as they won’t sit flat on the chart.

Method 4: Plastic Ring Sizer Kit
A plastic sizer kit is the most foolproof option for beginners:
-
Take the plastic rings (labeled with U.S. sizes) and slide them onto your target finger one by one.
-
Stop at the ring that fits snugly but can still slide over your knuckle with a little effort—this ensures it won’t get stuck when you put it on or fall off accidentally.
-
Note the size on the plastic ring—this is your exact size. These kits are especially useful for measuring kids’ fingers or if you’re unsure about other methods.
Pro tip: Keep the kit for future use—you can remeasure if your finger size changes (e.g., after weight loss or gain).
Method 5: Measure an Existing Ring (For Gifting)
If you’re measuring someone else’s ring size (without spoiling the surprise), use their existing ring:
-
Borrow a ring they wear on the same finger and hand as the new ring (e.g., left ring finger for an engagement ring).
-
Place the ring on a ruler and measure the inner diameter (from one inner edge to the opposite inner edge) in mm.
-
Convert the diameter to size using a chart (e.g., 17.5mm diameter = U.S. size 7). If you can’t borrow the ring, trace the inner circle of the ring onto paper and measure the diameter of the tracing.
Pro tip: If the ring has a thick band, add 0.5mm to the diameter measurement to account for the band’s width.
Common Mistakes to Avoid When Measuring Your Ring Size
Mistake 1: Measuring Too Tight or Too Loose
Wrapping the measuring tape, string, or sizer too tight will give you a size that’s too small—leading to uncomfortable, restrictive rings. Wrapping it too loose will result in a size that’s too big, increasing the risk of loss. The correct fit should feel secure enough to stay on but loose enough to slide over your knuckle without forcing it.
Mistake 2: Ignoring Knuckle Size
If you have larger knuckles, measuring only the base of your finger will lead to a ring that fits the base but gets stuck on the knuckle. To fix this:
-
Measure the base of your finger and your knuckle (both in mm).
-
Choose a size that’s between the two measurements. For example, if your base is 54mm (size 6) and your knuckle is 56mm (size 6.5), go with size 6.5—this ensures the ring slides over the knuckle and stays on the base.
Mistake 3: Using Inaccurate Tools
Avoid using stiff paper, yarn, or rulers without mm markings—these tools lead to guesswork. For example, yarn stretches easily, giving you a larger-than-actual measurement, while paper strips don’t conform to your finger’s curve, resulting in a smaller size. Stick to flexible measuring tape, string, or plastic sizers for reliability.
How to Measure Your Ring Size for Someone Else (Without Spoiling the Surprise)
Tip 1: Borrow Their Ring (Discreetly)
This is the most accurate method for gifting. Sneak a ring they wear on the target finger when they’re not looking—try doing this while they’re sleeping, showering, or out of the house. Measure it using the printable chart or ruler method, then return it to its original spot immediately.
Pro tip: Take a photo of the ring next to a ruler (for diameter reference) if you’re worried about forgetting the measurement.
Tip 2: Ask a Trusted Confidant
If you can’t borrow the ring, ask a friend, family member, or roommate who’s close to them. Say something like, “I’m thinking of getting [Name] a ring—do you happen to know their ring size?” Many people share this info with loved ones, especially if they’ve talked about jewelry in the past.
Tip 3: Turn It Into a Game
For casual gifting (like a birthday or holiday), create a fun activity to measure their finger without suspicion. For example:
-
“Let’s see who has the biggest finger—wrap this string around yours, and I’ll compare it to mine!”
-
“I saw this cool ring size quiz online—can you wrap this tape around your finger so I can check?”
Once you have the measurement, pretend to “forget” about it and jot it down later.
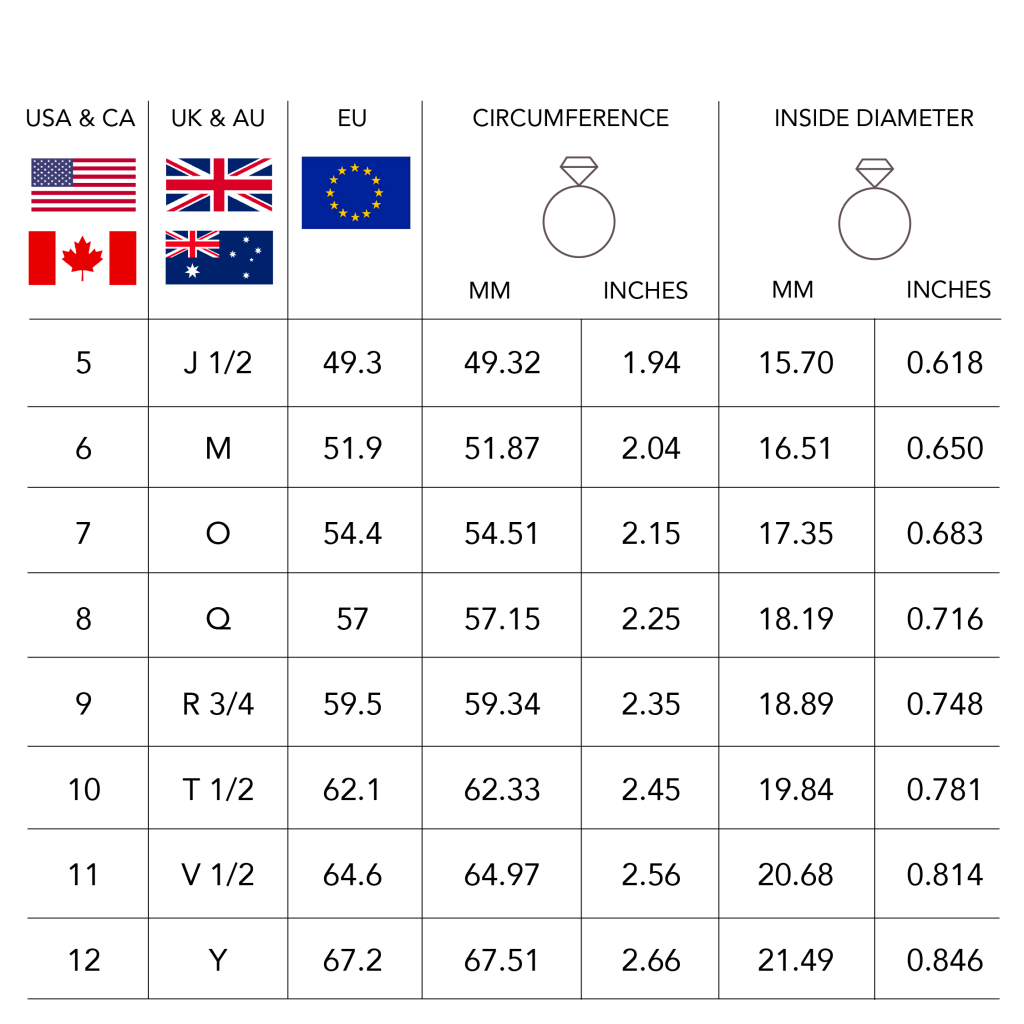
How to Convert International Ring Sizes (If You Shop Globally)
U.S. to European Sizes
European sizes are measured in mm (circumference), so conversion is straightforward. Use this quick reference:
-
U.S. size 5 = 51mm (European size 51)
-
U.S. size 6 = 54mm (European size 54)
-
U.S. size 7 = 57mm (European size 57)
-
U.S. size 8 = 60mm (European size 60)
For sizes outside this range, use an online converter—input the U.S. size or mm circumference to get the exact European equivalent.
U.S. to UK/Australian Sizes
UK and Australian sizes use letters (A–Z) instead of numbers. A common conversion chart:
-
U.S. size 5 = UK size J
-
U.S. size 6 = UK size L
-
U.S. size 7 = UK size N
-
U.S. size 8 = UK size P
Note: UK sizes start at A (smallest) and go up to Z (largest). If you’re buying from a UK retailer, double-check the conversion—mix-ups here are a top cause of sizing errors.
What to Do If Your Ring Size Is Between Two Sizes
When to Round Up (Or Down)
If your measurement falls between two U.S. sizes (e.g., 55mm, which is between size 6 and 7), follow these rules:
-
For Wide Bands (6mm+): Round up. Wide bands sit tighter on the finger, so a larger size ensures comfort.
-
For Thin Bands (2–3mm): Round down if you prefer a snug fit, but round up if you want to avoid tightness.
-
For Engagement/Wedding Rings: Round up—you’ll wear these daily, so comfort is key.
Pro tip: If you’re unsure, visit a local jeweler for a free professional measurement—they can confirm which size works best.
How to Adjust a Ring That’s Already the Wrong Size
If you already have a ring that doesn’t fit, don’t panic—most jewelers offer affordable adjustments:
-
Too Big: Jewelers can add a “sizer bead” (a small metal bead inside the band) or resize the band by cutting and soldering it smaller. This costs \(20–\)50 for most metals (sterling silver, gold-plated).
-
Too Small: Stretching a ring is possible for thin bands (up to 1 size larger), but it’s not recommended for thick bands or precious metals (like solid gold). Instead, jewelers may add a small piece of metal to the band to increase its size.
How to Measure Your Ring Size for Kids (And Growing Fingers)
Measuring Kids’ Fingers Safely
Kids’ fingers are smaller and more delicate, so use a gentle method:
-
Cut a thin strip of paper (1/2 inch wide) and wrap it around their finger—avoid string, as they may pull it too tight.
-
Mark the overlap with a pencil, then measure the length in mm with a ruler.
-
Use a kids’ ring size chart (U.S. kids’ sizes range from 1 to 4) to find their size.
Pro tip: Measure while they’re calm (e.g., after a nap or snack) to avoid wiggling, which can skew results. Have a toy or snack nearby to keep them distracted.
Choosing Adjustable Rings for Kids
Since kids’ fingers grow quickly, adjustable rings are a smart choice. These rings have a sliding band or open design that can be resized as their finger grows—no need for frequent trips to the jeweler. Look for adjustable rings made of hypoallergenic metal (like sterling silver or titanium) to avoid skin irritation.
Conclusion: Master How to Measure Your Ring Size for Stress-Free Shopping
How to measure your ring size doesn’t have to be complicated—and avoiding the 52% return rate starts with using the right tools and timing. Whether you’re measuring your own finger with a plastic sizer, using a string to measure a loved one’s size, or converting international sizes for online shopping, the key is to be precise and account for factors like knuckle size and finger swelling. With the methods in this guide, you’ll never have to deal with a too-tight or too-loose ring again.
Ready to put your new skills to use? Grab a measuring tape, string, or printable chart and measure your ring size today—then shop for that perfect ring with confidence. If you’re still unsure, visit a local jeweler for a free professional measurement—they can answer any questions and help you find your exact size. Don’t let sizing mistakes hold you back—get the perfect fit and enjoy your new ring for years to come!